Elizabethan Ruffs: Washing, Starching and Ironing

by Noel Gieleghem, First published for the September/October 2011 issue of Finery

If you followed the instructions in Part One of this article, Ruff-ing It (printed in July 2011), you’re now the proud owner of a rather bedraggled ruffled collar. Starching and ironing will turn that humble object into a bona fide Elizabethan ruff. The final shape is determined, for the most part, by how a ruff is ironed, rather than by how it was constructed.
To perform this miracle, you’ll need: your completed ruff; an electric curling iron; a needle, about 36″ white thread, a ruler, and some sort of marking pencil; soap or detergent, OxiClean, hot water, and a white towel; starch (either purchased or homemade); a steam iron and spray bottle full of water; and a ruff stand (or a bottle filled with water) on which to mount the ruff while ironing.
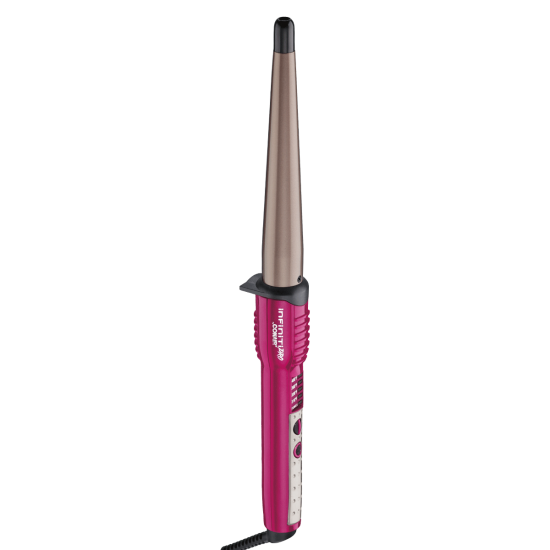
Buy a few curling irons at your local thrift shop, getting a selection of barrel diameters. With a screwdriver, remove the plastic tip and bail (which holds the hair against the heated rod). Alternatively, purchase a new Conair brand conical curling iron (the short, travel model is best).
Use your curling iron to gauge your setts by pushing the tip of the iron toward the neckband of the ruff and pinching the exterior edge of the ruffle around the barrel, marking the point where the edges meet. This is the unit of measure for one sett for this particular curling iron. For example, say you’ve gauged the sett and your unit is 3″. Starting at the center back (CB) of the ruffle (which you marked in Part One), make your first marking at 1.5” and then each subsequent mark 3″ from that, working toward the center front (CF). Do not use a washable marking pen as the marks often don’t wash out completely. If the edge of the ruffle is finished with lace, you can measure using the repeats in the lace during the next step, skipping the marking process entirely.
Thread your needle and, starting at the CB, pinch the CB mark so that it’s the top of the CB sett. Working inside the sett toward the right CF and leaving a long thread “tail” at the CB, pass the needle through the first 1 ½” mark, and continue through each 3″ mark until you reach the right CF. Unthread your needle, leaving a long tail at the right CF. Return to the CB, rethread your needle with the long tail you left there, and proceed to the left CF. Your last setts at each CF might be less than a full repeat, but they should be equal in size.
After basting the setts, wash the ruff with hot water and OxiClean, since chlorine bleach destroys linen. Wash gently by hand — no wringing! Remove excess water by blotting the ruff in a white towel.
I recommend making your own starch. The two most common starching techniques are “cold” (using raw starch dissolved in water), and “cooked” (using boiled starch). The Elizabethans used cooked or “seethed” starch, and I use this method as well. I don’t recommend pre-made StaFlo, as it’s not thick enough to give a good result with a single application. The Elizabethan starches of choice were wheat and, to a much lesser degree, rice starch. Both wheat and rice starch are available from bookbinders (www.talus.com) and are worth seeking out. Powdered laundry starch is difficult to come by and unnecessary, as it’s mostly cornstarch.
A good basic recipe is two tablespoons raw starch (wheat, rice, or corn) mixed with one cup cold water. Mix the starch with a little cold water to form a paste, and then add the remainder of the water. Either microwave in 30-second cycles on “High” or heat the mixture on the stove, stirring constantly, until it becomes thick and transparent. Strain while hot through a fine sieve. This proportion will make a fairly stiff starch “jelly,” which will thicken as it cools.
Apply starch to damp (not dry) linen by dipping the ruff in the undiluted, warm starch and working it into all of the folds. Finger “squeegee” out the excess starch, leaving a relatively thick coating. After starching, you must let the ruff dry completely, which will take a few days. Check the setts as the ruff is drying so that they do not dry stuck together.
When you’re ready to iron, lightly dampen the ruffle, using a spray bottle filled with water or starch. You want the ruffle to be just slightly damp. Often a few blasts of steam from a steam iron will be sufficient to relax and dampen a starched ruff. The damper the ruff is, the longer it takes to iron, and the more the un-ironed damp sections will wick water into the ironed sections, undoing all of your hard work. Your goal is to have the ruff as dry as possible, while still leaving it damp enough to relax the wrinkles. This takes practice. Iron the neckband flat using the steam iron.
Mount the ruff on a ruff stand and fasten it. Heat your curling iron to the hottest setting. Starting at the CB, grasp each sett where the basting thread passes through the “waist” of the sett. Push the iron into the sett, pinching at the basting thread, and gently force the iron into the sett. It will unwrinkle and become rounded. Go to the next sett, on the same side (top or bottom) and repeat the process. Continue until all the setts are ironed. Undo the ruff and flip it over. Repeat the process. If the linen is not relaxed enough, hit the ruff with a blast of steam, but try not to steam what you’ve already ironed.
I’ve uploaded four short videos of the process to YouTube: http://www.youtube.com/watch?v=viq5XL8dy6c
The last two setts at right and left CFs might need to be finessed. You can cheat backward a few setts in each direction, but it isn’t really necessary. Slight unevenness wasn’t an issue if you look at the portraits.
If you use non-conical curling iron as a poking stick you’ll end up with an unpressed “valley” at the neckband. You can pop this open with the end of a wooden spoon. This isn’t absolutely necessary as ruffs constructed in this manner tend to hide this valley when you put them on. But for perfectionists, a little poking and finger pressing will smooth out this dip. If you use the Conair conical curling iron, you won’t have this problem.
Pull the basting thread tight to secure the ruff and hold the setts until the ruff is completely dry. This is a good way to store a ruff. I keep this thread in place until the last possible moment. Unruly setts can be pinned in place and pins were used to hold setts in place while a ruff was worn.
An expanded version of these instructions, with more pictures, is available at http://tinyurl.com/693bzjc

Leave a comment