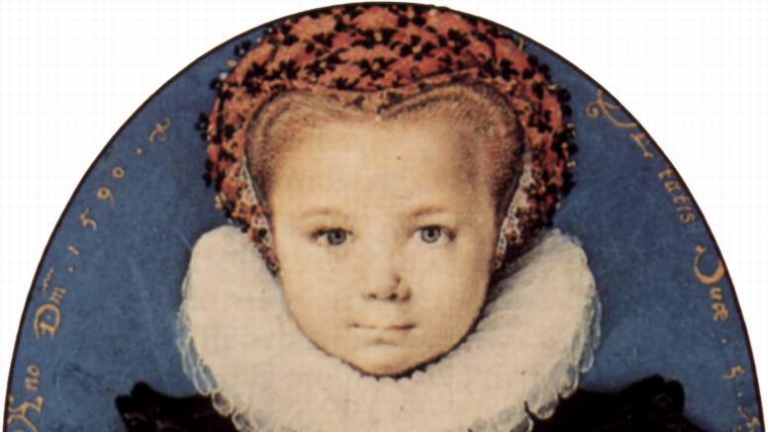
Ruff-ing It: Authentic Ruff Construction

by Noel Gieleghem, First published for the July/August 2011 issue of Finery

No costumer’s career is complete without making at least one authentic Elizabethan ruff. Consider it a rite of passage. Here’s a recipe to create a 1570s-style stand-alone linen ruff of moderate fullness and depth. It’s a great jumping-off point for other projects which contain the “organized frill,” such as the cuffs and collars of shirts, smocks, and partlets. The sewing (with the possible exception of hemming or applying lace) is actually more easily done by hand than by machine, making ruffs a perfect “take-along” project. These directions produce a ruff with a 15″ finished neckband. Adjust the measurements according to your needs. For neckbands ranging from 14″-17″, there’s no need to change the length of fabric in the ruffle.
“Ruffle” describes the part of the ruff that is ironed into setts (the figure eights); the “neckband” is the part that encircles the wearer’s neck. Elizabethan ruff makers don’t appear to have used a mathematical formula to determine the amount of fabric for the ruffle. 150″-180″ is plenty for ruffs under 4″ deep. The preferred method used strips cut across the width of the yardage, joined short end to short end, selvage to selvage. In spite of what you may have read or heard, don’t use strips cut from the length of fabric or use the selvage as the exterior edge. Don’t use fishing line or nylon horsehair. Don’t double the ruffle (folding the strip in half lengthwise). Starching will provide all the stiffness you need. Trust me! Use linen, as they did in the Elizabethan era.
Here’s what you’ll need:
• Ruffle: 150-180″ x 3″ of 2.8 ounce white, even-weave linen (check wmboothdraper.com)
• Neckband: 16″ x 8″ of the same fabric, or something coarser (15″ neckband)
• 100% fine cotton or linen thread for hemming and construction
• Heavy-duty cotton or polyester thread for gathering the ruffle (carpet or cordonnet)
• 157-187″ cotton or linen bone or bobbin lace (if desired)
• Bleached beeswax
• Closures (hooks and eyes, a band string and eyelets, or buttons and buttonholes)
Choose fabric with a tightly-woven selvage and clean-finished (not fuzzy) edge. If the selvage is compromised or missing, joining the ruffle strips will be more difficult. For construction, I use 100% fine cotton thread; if you like linen thread, use it. Wax your thread, using bleached beeswax (unbleached beeswax leaves a yellow residue). For gathering, use super-strong thread. You don’t want it to break! Don’t wax the gathering thread.
For lace, I use un-gathered cotton since white linen lace is almost impossible to find or very expensive. Dharma (www.dharmatrading.com) carries simple, period-appropriate lace. Pay attention to scale and err on the small side. Lace is optional, but strongly recommended for first-time ruff makers. It’s a great tool for gauging the setts when you iron.
Preshrink the linen in hot water, starch it lightly, and iron it flat. Always pull a thread to determine the true grain and then cut along the line created by the pulled thread. Don’t cut freestyle! For the ruffle, fabric width determines the number of strips you’ll cut.
Join the strips, short (selvage) end to short (selvage) end. Using waxed thread and a fine needle, make an abutted join by whip-stitching only the very edge of the selvages together. If there’s no selvage, make a flat-felled join, as small and as strong as possible.
After joining the strips, finish one long edge and the two short edges, hemming or applying lace. Finished hems should be no wider than 1/8″ (or smaller), and should fold the edge of the fabric no more than twice. The hem should be a small as possible. Determine the center back of the finished edge and permanently mark it using a French knot or embroidery. This mark is very important when you gauge and iron the setts. Don’t skip this step.
Next, gather the strip. Almost all surviving ruffs seem to have been gathered in more or less the same manner: regular 1/4″ cartridge pleats using 2-4 parallel rows of gathering stitches. No accordion pleats. No stacking. No complicated formulae. Leaving the heavy-duty thread on the spool, thread a blunt-tipped (crewel) needle (which allows the tip to pass between the fabric threads rather than splitting them). Don’t cut the thread yet. Make the line of gathering stitches about 1/8″ from the unfinished edge. Run 2-3 more parallel lines of gathering stitches spaced 1/4″ apart. Leave the fabric flat throughout this process. Don’t gather as you go along. At the end of each line of gathering stitches, cut the thread, leaving 10-12″ tails at beginning and end.
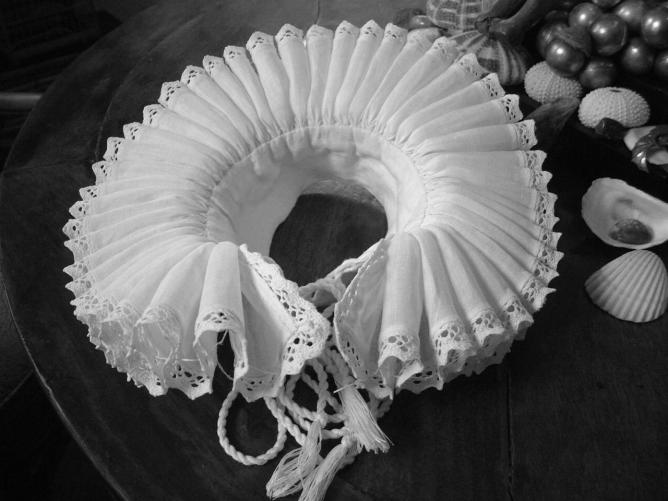
Gather to 15″, stoking the gathers, making sure they’re evenly distributed and stand up straight. Use a shot of steam from a steam iron to set the pleats.
For the 15″ neckband, cut a 16″ x 8″ rectangle. Fold this rectangle in half lengthwise, and press. Unfold, and then fold the two long edges to meet the center crease line. Press. Your strip will now be 4″ wide. Unfold completely and then fold in 1/2″ on each of short ends. Press. Refold the two long edges toward the center fold line, and then bring the two long folded-over edges together. Your neckband should now be 15″ x 2″. Press well to set all the folds. Authentic neckbands were not curved or shaped.
(For other than a 15″ neckband, loop the gathered ruffle snugly around the neck, directly beneath the chin. Remove and measure. The ruffle is bulky and will increase the usual neck measurement. Adjust the length of your rectangle accordingly. The width does not change.)
Lay one long, folded edge of the neckband on top of the gathered ruffle, parallel to the most interior gathering thread. Double-check that the gathers are distributed evenly. The end of the ruffle should stop a bit shy (1/16″) of the short ends. Baste (don’t pin) in place. Working from the center of the neckband to the short ends, whip-stitch the folded edge of the neckband to the pleated ruffle using a small stitch.
Fold the other long, folded edge of the neckband over and around, encasing the raw, gathered edge, and stitch in place. After all stitching is complete, knot the gathering threads securely. Clip, leaving 1″ tails, and tuck the tails into the neckband.
Don’t trim the seam allowance on the ruffle. The neckband edge at the base of the ruffle will be quite thick. This creates a sort of fabric “boning” that holds the ruffle up and away from the neckband.
Finish the short ends by whip-stitching them closed, as close to the edge as you can. Neckbands were held closed in a variety of ways, and ruffs were also basted or pinned into place at the collar of the outer garment or the shirt, smock, or partlet.
Work the buttonholes and add buttons, or work eyelets and use a band string, or add hooks and eyes. All three are period-appropriate closures. I’m not a fan of sewn-on ties for ruffs.
You’re now ready to starch and iron your completed ruff. That process will be covered in Part 2, Elizabethan Ruffs: Washing, Starching and Ironing, coming in the September 2011 issue.
An expanded version of these instructions, with more pictures, is available at http://tinyurl.com/693bzjc
Leave a comment