Yes, You Can Fit Yourself!

by Katherine Caron-Greig, First published in two parts for the May/June and July/August 2006 issues of Finery
I went to my first Costume College in 2003. I had been sewing for almost a year and a half at the time and, excepting some very stubborn eyelets that I couldn’t pound into a corset properly, had never had any help with any aspect of my sewing. Because of that, I was quite surprised to meet many people who thought fitting yourself was impossible. I hadn’t even considered fitting a bodice with help. While the idea did sound nice, it just wasn’t-and still isn’t-an option for me.
Fitting is my least favorite part of sewing. It doesn’t help that I often use scaled patterns that have no indication of what size they are, taken from clothes that most likely belonged to someone with a different body shape from mine. However, I’ve found that fitting a scaled pattern, while it may take a little longer, is really no different from fitting a commercial pattern. While fitting hasn’t become any less annoying. it definitely has become less frustrating.
Getting Ready-First, cut out your muslin.
If you’re using a commercial. pattern, choose the size closest to measurements, erring on the side of slightly too big if you are between sizes. I find that it’s much easier to make a bodice smaller than it is to make one bigger.
My favorite way to enlarge a scaled pattern is on the copier. You don’t need to enlarge it to the exact size of the original. If you know you’re going to need a longer bodice, make the copy larger than the original, or smaller for a shorter bodice. Getting close to the right length is more important than the right width. Not only is it easier to gauge, but adding and subtracting width is easier than adding and subtracting length.
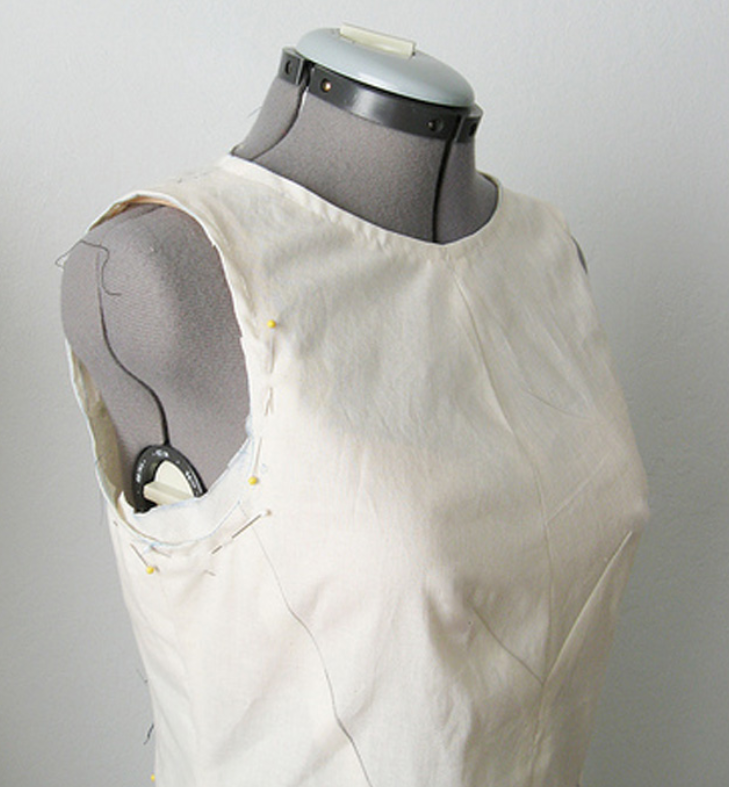
Now, what to do with the muslin. I’ve tried to simplify the process as much as possible. When I started sewing, I made my first muslin on the sewing machine using small stitches. Not long after that I started using longer, easier to pull out stitches. That was still too much work. I found that I got frustrated pulling out stitches all the time. Plus, the cats liked to play with the threads. Not good. Now for the first muslin, I pin the pieces together with the pins running parallel to the seam allowances; I put these pins half an inch in so they imitate a seam.
Now, try it on with the pins on the outside. The chances of it being correct on the first try are very small, of course, so don’t worry about the proper underthings yet. For me at least, it saves a lot of frustration to get a “close enough” fit without a corset or whatever you’ll be wearing under your dress. Once I’ve achieved this close enough fit, I’ll finally make a sewn version and try it on over the corset to make any additional adjustments. This of course works better for some body types than others. If your shape is drastically different in your corset than without, I wouldn’t recommend this. However, if you won’t be wearing a corset or you don’t change too much, it is an excellent time saver.
Now you’re ready to get started!
Step One-The Back
One of the most important things in fitting the back is to ignore the front. The front’s only purpose at this time is to be pulled forward to mimic being worn. With your bodice pulled tight, check the fit of the back in the mirror as best you can. Does it look smooth or is it too tight or too loose? Do the armscyes sit in the right place? Are they smooth or does fabric stick out in back? Is it sticking out from the back of your neck? Does it sit too high or too low on the neck? Don’t worry if you can’t see things exactly. While there is guesswork involved in fixing things, once the fit is right, you’ll be able to tell.
The first thing to adjust is the length. A too long bodice will cause wrinkling which will get in the way of other adjustments. If it’s too short, you won’t be able to adjust the bodice at the waist. For most patterns you can simply trim or lengthen the bottom edge as needed. If this doesn’t work with your pattern, or you need length taken out or added above the waist, another good place to just the length is at arm level. Estimate the length you need to add, and either take a tuck or cut a new piece with the added length. Your bodice should reach the desired waistline plus about half an inch for finishing the edge or attaching a skirt.
With width, one important thing to remember is where you want your side seams. For most historical periods the underarm seams aren’t directly under the arms, but rather slope towards the back. This gives a little freedom in exactly where these seams arc placed. As long as they look good, fit the style of the bodice, and the bodice fits you, they’re fine.
When adjusting the width, take note of where you need it. Usually I prefer to add to the middle of a piece and not the seams, but the center back is an ideal place to add or subtract width, whether there’s a seam there or not. If the back piece is too loose or too tight all the way down, make an estimate of by how much. This is easier if it’s too large; just pin down the center to make a larger seam allowance if you have a center back seam, or pin a fold if not. If it’s too tight. estimate about how much extra fabric you need and just set your pattern piece away from the center fold (or increase the center back seam) by half that distance.
If the top of the back fits. and the bottom doesn’t or vice versa, make a mark where you need to either take it in or let it out. Use a regular pen; it’s much easier to use than a fabric pen. Just reach around your back and do your best to hit the spot. What’s important is that you get the approximate location. You can then fold a dart or increase your seam allowance from the marked point if that section is too large; if it is too small there, you can increase the seam or place the pattern piece on the fold and angle it slightly away from the fold to give room you need.
If there are side back pieces, you may want to adjust the width of those as well. Quite often though, adjusting the center back is enough.
Sometimes the back will fit except for sticking up a little at the neck. You can either take a dart in the neckline or increase the seam allowance, which changes the angle of the shoulders so they pull more tightly. If the neckline sits too high, simply trim fabric away.
If the armscyes stick out in back, pin darts in them until they lay smooth. Don’t worry about gelling them to fit perfectly until you work on the front.
Once you’ve done all this, you’re ready to re-cut your back. Take the muslin off and lay your back pieces down on your fabric. Smooth them out as much a possible. There will be lumps in the fabric, but that’s fine. Cut along your new seamlines and check for fit. Once you have a well-fitting back, the front is relatively easy.
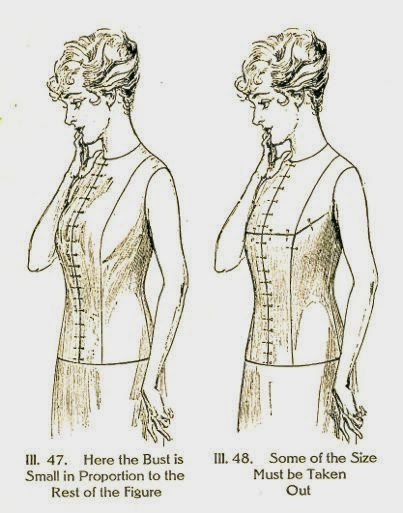
Fitting the Front of a Bodice The three parts of the front where you’ll need to make most of your adjustments are the neckline, armscye, and center front.
Now that your back is nicely fitted, your front has the support it needs, Put the bodice on again. Pin it closed down the center front. Smooth it out as much as possible over the bust. If you’re fitting a Victorian bodice, there’s no need to worry about the waist since that will be taken in with darts. For earlier bodices, pin it smoothly all the way down if possible, This will be the center front line of your bodice. Don’t worry about how much or how little fabric you have leftover at center front. You can adjust this later so you have the correct amount of overlap. A half inch plus a seam allowance for a facing (or enough to make a self-facing) on each side is usually fine.

Many issues in the chest can be taken care of by fixing the armscyes. Once they fit comfortably, you can usually fix any width issues in the center front. If the armscye is too tight, either trim fabric away to widen it or add length to the back of the shoulder. If it’s too loose, either take a dart in it-the front comer is usually a good place to do this-or take Iength away from the back of the shoulder.
The neckline is quite simple to fix. Assuming you’re making a high-necked bodice. trim it if it’s too high, If it’s too low. put a dart in it in the comer of the curve. This will likely change the center front line, but that’s fine. Just re-pin it.
If you’re making a bodice without darts and were unable to pin it so it fit smoothly below the bust you can make darts or add more space in your muslin to make it fit and then just use the new shape for your pattern. Once you’re done. follow the same procedure as for the back to make a new pattern piece
General Suggestions
Do your first muslin with pins instead of seams. Just pin them so they’re parallel to the seam allowance. A lot of issues can be solved this way and it’s a lot easier to re-pin than it is to pick seams out and sew them again. Once the fit is mostly right, then sew the muslin together.
If you have a camera with a self-timer (or someone who can take pictures. even if they can’t help you otherwise!), take pictures of the fit. This is an excellent way to catch trouble spots.
If time allows. make only one muslin a day. This can save a lot of frustration! Once you get more familiar with your body shape and know what to do. this won’t be as important, but I found this to be very helpful in the beginning.

Leave a comment