Sewing Hints for Vintage Patterns

by Sally Norton, First published for the January/February 2006 issue of Finery
Using vintage patterns creates a whole new set of issues and requirements. The hints listed herein should help make your experience more enjoyable. Prior to 1960, most people sewed many of their garments and sewed for their homes: curtain, linens, tablecloths and napkins. Sewing expertise varied, of course, but general knowledge and basic sewing skills were commonplace therefore, pattern companies, assumed a considerable amount of experience among the general populace.
Before you choose to make up a vintage pattern, assess the level of your skills. How much sewing have you done? What kinds of garments have you made? What tasks have you performed successfully or not (setting a sleeve, creating a welt pocket, making a buttonhole, etc.). Be honest with yourself (you don’t have to reveal to anyone, the results of your self-assessment).
Take a look at the vintage patterns you are considering making up. Are you making it for a specific event or just to add to your wardrobe? If you’re making it for a specific event, factor in your time constraints. Narrow your choice down to two or three patterns; then, ruthlessly analyze the patterns and your skill level.
You have two approaches as you go forward. One is to take a deep breath, choose your pattern and jump off the high diving board into a new adventure. This first approach can work if you’re the type of person who is good at figuring out problems (whether it’s a sewing pattern, Advanced Algebra, the time table of the British Rail System or the new scoring system for international figure skating competition). If you’ve got a lot of patience, handle frustration well (i.e., you don’t actually cause bodily damage to anyone near you), and your basic sewing skills can honestly be described as a solid intermediate level, then go ahead and jump in.
The other approach is to purchase a sewing book or manual published during the same decade the pattern was created/sold. Vintage sewing books and manuals are readily available on eBay and vintage sewing websites. There is a large supply and they generally are not expensive. Study your new vintage sewing manual. Do some of the tasks described. Do some practice seams, cutting, pressing–all as described in the manual. Get used to terminology and the different approach to putting a garment together. This second approach requires more time commitment. It will pay off if you anticipate sewing more from vintage patterns.
General Hints
If the vintage pattern you acquire is not cut up, then do not cut it. Make a tracing and cut your pattern pieces from the tracing. The vintage pattern pieces will be easier to study and easier to fold and store for future study if they are not cut. It’s all too easy to lose a small pattern piece once a pattern is cut. Remember this is an old pattern and once damaged, cannot be replaced.
If you have a friend who has successfully sewn vintage patterns, keep his/her phone number/email close.
Make the pattern up first in muslin in exactly the size the pattern comes in. Do not do any scaling. Use a brightly colored thread and a basting stitch. The advantage of this step is that you will see exactly how the pattern does or does not go together. In looking at an assembled garment, you can determine whether this style is right for you. Once you see the neckline sewn or inset side waist gussets or the unusual sleeve construction, you can review whether it will be worth the effort and if you’ll look good wearing this style.
It is highly likely you will have to adjust the fit in the shoulders and across the back. Fashion and beauty magazines in the late 19th and early 20th centuries contained numerous articles instructing their readers in the benefits of regular exercise and a healthy diet but, regular exercise did not usually include lifting weights. Today, weight-lifting is an ordinary part of a health regimen for many women and therefore, our shoulders and backs are broader than was the norm when these patterns were designed and made.
Choose a fabric you’ve worked with and are confident using. Do not attempt to make up your first vintage pattern in silk faille if you’ve never worked with silk faille before.
You may not see notches. You will see perforations (0 0 0). Large double perforations (00 00) indicate where they must be placed parallel to the selvage in the Layout. Triple perforations show where fabric must be folded. These descriptions are not absolutes. Be sure to carefully read any instructions that come with your pattern.
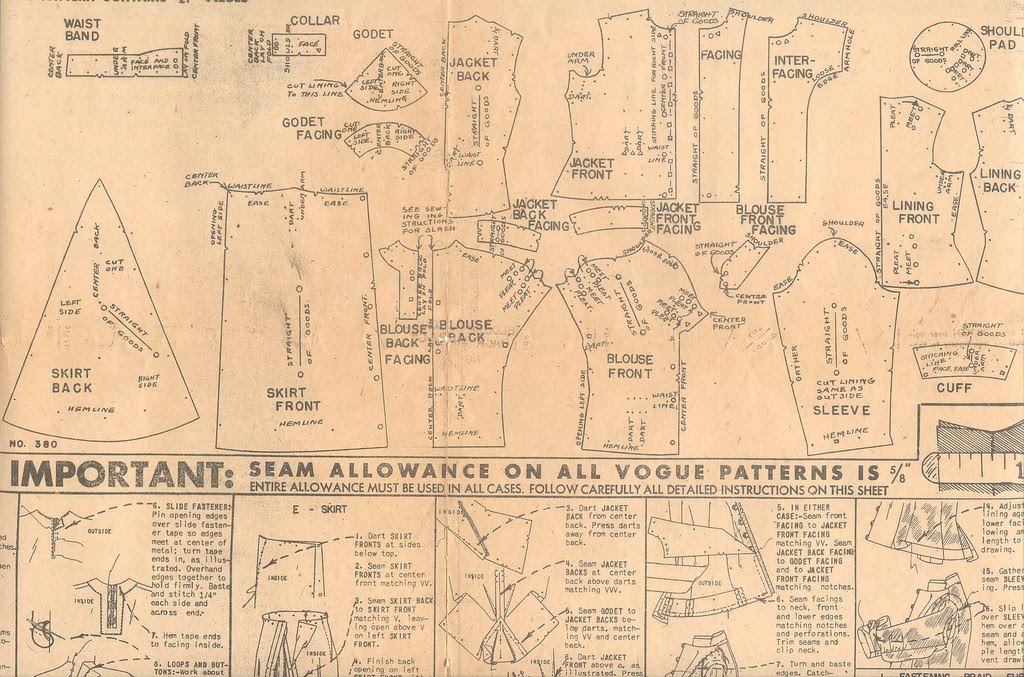
It is also likely the pattern pieces may not have any text printed on them; they may only be marked as No. I, No.2, No.3, etc. This is common in Pictorial Review patterns from the Teens and Twenties. You’ll have to cut out your tracing of the pattern pieces, lay them out flat and compare them to the Layout drawing.
Don’t toss the pattern envelope aside. Layout drawings, instructions and fabric requirements were printed on the front and back of pattern envelopes by some companies. No separate printed instruction sheets were included. Good luck and good sewing.
Editors note: There is a very helpful blog posting about deciphering the markings on various early patterns at http://newvintagelady.blogspot.com/2010/08/vintage-pattern-primer-reading-vintage.html
Leave a comment