Deciphering Regency Sleeves

by Jennifer Rosbrugh, First published for the March/April 2012 issue of Finery

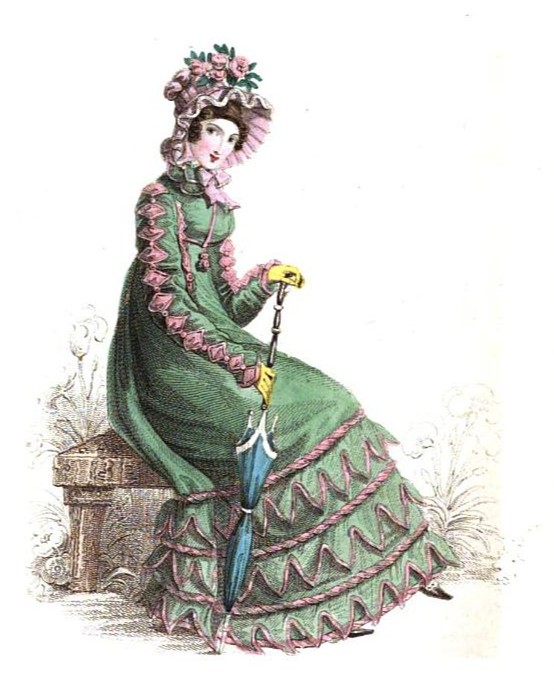
Fashionable dress in the Regency years (1795-1820) is fairly uncomplicated. Although the bodices and skirts are relatively simple, the true area of design is the sleeves. Where else do you put your personality into a garment if the skirt is plain straight and the top simply covers what it needs to?
If one is only slightly acquainted with the Regency, you might think it’s bursting at the seams with short puffed sleeves. But there were actually a vast array of design options. Take a foundation shape, factor in your unique figure attributes, and you’ll happily discover how to avoid the “mutton dressed as lamb” or “stuffed sausage” look. Let’s take a brief look at the variety of simple sleeve options available for your early 1800s gown.
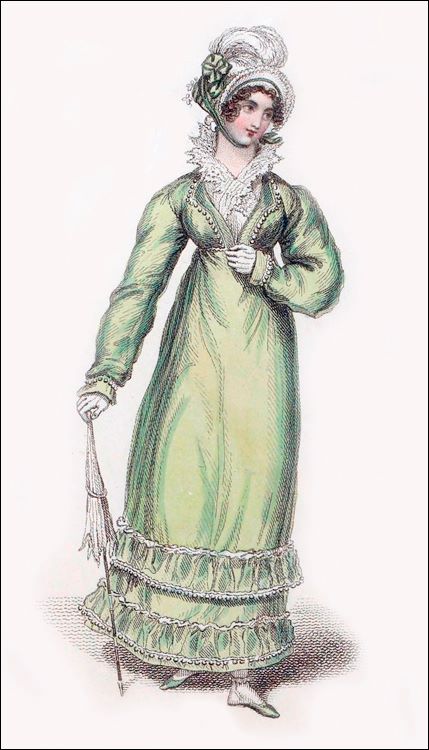
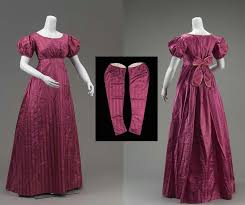
The short, puffed sleeve (called a bishop sleeve in period publications) is a typical Regency style. It can be set smooth into the armhole or have a bit of fullness – especially as you move into the 18-Teens. Generally, the fuller the sleeve head, the later the style. To make it a bishop style, the hem edge is gathered up to fit a narrow band. It might also be taken up to match a fitted undersleeve (lining), sometimes called a stay. Regency puffed sleeves could be either lined or unlined. For a simple decorative touch on a basic puff sleeve, pull up the center of the sleeve, and tack and sew on a button or trim to cover the gathering stitches. For later years, you can sew three vertical bands from the armhole down to the hem band with the sleeve puff “trapped” beneath. This decoration can be used on an over sleeve on top of a false or regular long sleeve and on fashionable evening gowns.
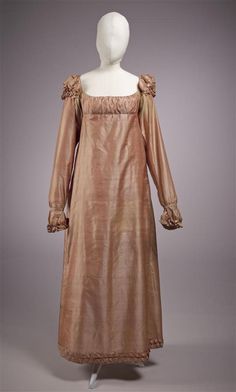
Basic straight, short sleeves are seen in the early Regency from the early 1790s through about 1810 or so. This sleeve style is cut with a straight underarm seam and no fullness at the narrow hem, and ends somewhere between the full bicep and the elbow. This is the perfect style sleeve (along with the long straight sleeve) for those lovely narrow-back bodices of the early Regency. The sleeve head is extended towards the back and gently eased or gathered into the narrow bodice.
The long straight sleeve is simply a longer version of the short straight sleeve. It can be cut with or without fullness in the head (again, depending on the time period) and falls at least to the wrist. Many Regency long sleeves, especially early on, cover the hand up to the knuckles. This can be done with a cuff, a bias-cut sleeve, or, when cut on the straight of grain, the long sleeve can be tightened at the wrist with a band closed with button or hook and eye. This style is seen throughout the period on day dresses, spencers, pelisses and coats. When in doubt, sew in a straight sleeve, either long or short, and you’ll fit right in.
For colder weather or a more modest look, a detachable or false sleeve was added to the lower edge of a short (puffed or straight) sleeve. The false sleeve was usually cut like the lower part of a long sleeve, finished with a narrow, rolled hem at the top and tacked to the short sleeve binding. These sleeve styles could be cut on the straight of grain or on the bias for a closer fit. The fabric of both the puff and lower false sleeve was generally the same. For a fabricated false sleeve look, add a drawstring casing at bicep level to the inside of a long sleeve. Draw up the sleeve to make it appear like a puff with a lower straight sleeve. Leave the casing area plain or cover with trim to further divide the two sections.
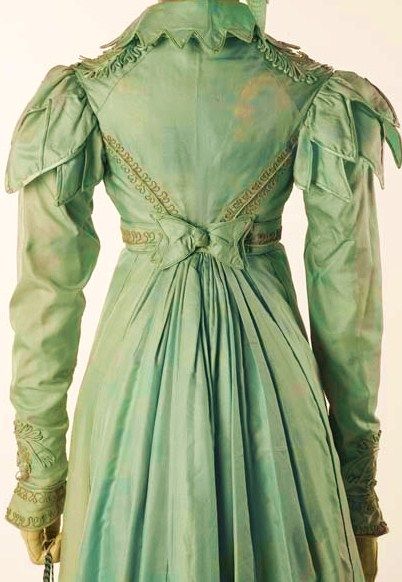
The bound or “Renaissance” sleeve was popular: a long sleeve bound by several horizontal bands from wrist to bicep. Sections of the sleeve were gathered up and sewn to a stay tape on the inside. The tapes were covered with ribbon or trim on the outside.

Shoulder seams were angled to the back, or a separate shoulder strap was set onto the bodice front and back. The armhole was at the shoulder point or slightly inward. No sleeve was off-the-shoulder. If your sleeve slips down, add a casing and drawstring to tighten your bodice to the body.
Regency gowns were not sleeveless. If you find a sleeveless Regency garment being touted as a gown, ask for the evidence and backup research. It could very well be an underdress or a bodiced petticoat.
Be honest. We have a pretty good idea of what looks good on our own figures. So, when designing for a Regency costume don’t take your characteristics out of the picture. I hear so much from other costumers about how they look horrible in Regency styles. Many ways exist to avoid this tragedy, but we’ll just concentrate on covering the arms.
If you have larger upper arms, don’t make your puffed sleeve band too tight around your arm. (No stuffed sausage!) If your figure is thin, follow the same – you want to have a bit of ease around your upper arm so it doesn’t draw attention to its lean look, unless of course you have well-toned muscles! For more “puff” to your sleeve, curve the hemline down on your pattern. A straight hem will hang closer to the arm. If you want to hide your upper arms, lengthen the underarm seam to 3-5″ so the hem hits below the widest part of the arm.
Straight sleeves flatter both fat and thin arms. Again, fit your body with a bit of ease added. Also keep the gathers on the top and side back of the sleeve head. For evening, stick with short sleeves but lengthen or shorten to your best length. A bound sleeve looks wonderful on a slim figure. Avoid this style if your figure is fuller, as the puffs will become the focus, as will your girth.
Have fun using your imagination to transform these basic shapes into wonderful sleeve designs with gathers and trim. When you know what kind of sleeves look best on you, you will feel confident to move forward on your costume. No more dressed mutton!
Editor’s Note: Jennifer teaches 19th century costume techniques for those who dream of the past. She is a member of CGW and a long time teacher at Costume College. Visit her website at www.HistoricalSewing.com

Leave a comment