$50 No-Sew Dickens Era Challenge Part 2: Elevating the Look

By Lauren Moyer
GBACG Webmistress & Social Media
Okay, now for part two of my $50 store-bought, no-sew challenge (check out part 1 here)… taking the look to the next level with decorations, accessories, and if you want, period undergarments. For this part, I used materials that I already had around the house leftover from various crafting projects. For some, this may be an additional expense, but I wanted to show how you can use random things you may have to make the outfit even better. So let’s take our bought $50 ensemble to the next level!

Let’s Start with the Bonnet!
This is the easiest way to make your outfit look very authentic and tie the outfit together and make it look polished! Bonnets were something that every woman had and would decorate them within an inch of their lives, even though the 1850s are less elaborate than previous eras I felt like you still can go crazy with decorating the bonnet!

Materials I used:
- Scrap polyester lace I had, I used about 18”
- 2.5” wide single-sided satin polyester ribbon, I had a spool I’ve used to decorating Christmas trees and making sashes with, I’ve had this spool for years and it’s still going strong. I used about 1 yd, a spool is about $5.99-7.99 at Joanns.
- Fake hydrangea flowers and feathers. I got a trash bag full of fake flowers for free at one of our destash events. I used 1 sprig, they run from $2-$10 at Joanns.
Step 1: Chin Strap
First, I cut out the chin strap ribbon that was on the inside of the brim. Bonnets in this time period were held on using hat pins (you can glue in a plastic comb as well if you don’t have a hat pin). So the ribbon around the chin was for decoration only or could be left undone.
Step 2: Lace
After that, I started by hot gluing the lace around the inside of the bonnet rim to frame my face.

Step 3: Ribbon
Next, I tried to figure out the ribbon on the outside. This was a no-sew challenge so I didn’t want to ruche the ribbon with a running stitch. My friend suggested doing pleats/folds in the ribbon. I pinned the ribbon to the bonnet to get a feel before hot gluing the folds in the ribbon and the ribbon to the bonnet.
Step 4: Flowers
After this, I started cutting up the fake flowers and pinning them on the hat. Since this bonnet has a wider brim I decided that little flowers on either side of my head would balance well. I didn’t want to put flowers at the top on the inside, but I think that’s a great option as well. I taped the flowers together, then with lot’s of hot glue on my fingers, glued them to the inside sides.

Step 5: Add All the Things!
At this point, I was really happy with the bonnet and almost stopped, but then thought “I could glue more stuff to it” and made a bouquet of the hydrangea and some yellow branch looking thing. I tied a bow around it with the same white ribbon (this took me way too long to figure out how to tie a nice bow), then again armed with hot glue gun attached the bouquet to one side of the bonnet.
I absolutely love the bonnet now and really surprised myself with its look. I mainly attribute it to my Dickens Fair friend Jessica being there while I made this so I could get her opinions. I highly suggest doing this type of crafting with a friend, because it makes it so much more fun and you question yourself less!

Accessories from around the home
To finish my look I searched my jewelry box, drawers and closet for items to make this dress really look like someone out on a stroll on a cold London day.
- Scarf/Shawl. I found the plaid blanket scarf that I wear all the time in the chilly SF winter (blanket scarves are seriously the best) and draped it around my shoulders like a shawl. Any shawl will look great, and you can find lots of knit granny shawls at thrift stores if you don’t have a big scarf to wear like a shawl.
- Brooch. I found a decorative pin that I used to pin the collar shut on my blouse instead of a safety pin.
- No-Sew Tailoring. I “tailored” the blouse to fit me better by using a safety pin to gather the center back for a more fitted look. I also ripped out this weird tuck on the side of the sleeve to allow it to be puffier.
- Purse/Bag. I used a drawstring bag from the 1960s that I bought at a vintage store so I’m never without my phone and money. I’ve used many different drawstring bags for purses including those that come with makeup or for traveling.
- Winter-wear. You could also wear some long gloves, or wear a muff with the outfit to get a wintery look.
- Belt. With the belt, you can change it out for a cloth belt, a wide ribbon or a waist cincher for a different look.

Taking the outfit to a more “Historical” level
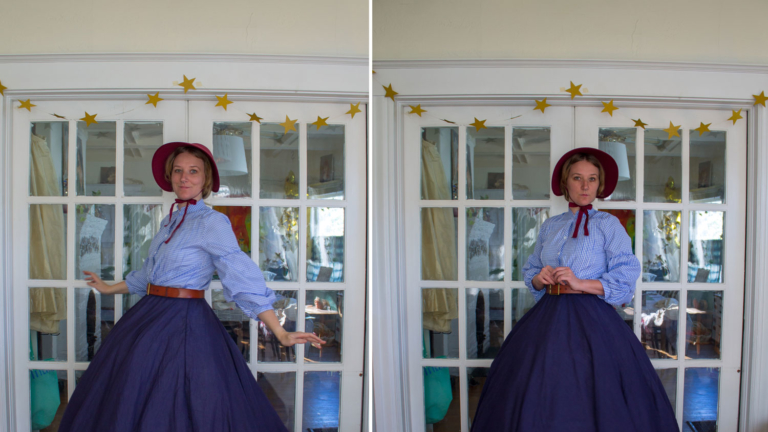
For those who want to make the outfit look more “accurate,” but still don’t want to sew, I decided to show what the outfit looks like with more period undergarments. This is an investment on top of your $50 base dress and can be added to your look at later times!
The Shoes. I wore my American Duchess “Balmorals” $180. These shoes are pricey; however, I wear them for daily wear and they are very, very comfortable and I find them as an investment especially if you want to wear Victorian-era attire more. I have also seen a similar style of “granny” boots at vintage stores and new on online retailers.

The Undergarments. I wanted to get a bit more fancy so I wore my split crotch bloomers and corset cover (instead of chemise) under my corset. I would normally have a corset cover for the outside but couldn’t find my other one. These two items are easily available on Etsy or eBay or at antique stores. Just give them a good clean and soak. But in all honesty I normally wear a modern slip under my corset and that works just perfect too.
The Corset. I’m wearing a corset that is not period-accurate and not the one I normally wear, but it is the most comfortable modern corset I’ve found. It is the Mesh Overbust Corset from Orchard $80. I like the curvy shape it gives me (I don’t corset down), and I’ve worn it with 1850s- to 1890s-style outfits. It’s very flexible and being mesh isn’t very heavy.
The Petticoat. For a more historical look I added an under petticoat so that my outer skirt didn’t show much of the hoops. This is really important to achieve a more accurate look and also the maxi skirt I bought was slightly sheer. This skirt I got at either a thrift store or Goodwill’s online store. You can also buy multiple maxi skirts for the same effect.

Put it all together!
Now when you add your decorated bonnet, accessories and potentially more period undergarments, you can see how versatile your outfit is and how it can grow as you get more into costuming or just keep it simple for now.
Whether you start simple and slowly add to your Dickensian-era outfit you will look amazing even without sewing a stitch or breaking the bank. Share in the comments other ways you’ve costumed without sewing!
Here’s a quick video of me getting dressed in my No-Sew Dickensian outfit!
Pingback: No-Sew Tudor Costume Challenge and Review - GBACG - the Greater Bay Area Costumers Guild